

Our dual-wood slab, live-edge table is finally completed! Hooray! For the longest time, this table has been in "idea-phase", but now we can say that the idea was put into production at our shop and now there is a physical result!
The slabs are white oak that we acquired as a result of needing to remove a couple of trees from our yard in order to preserve the foundation of our house. Rather than giving the tree-removal company the go-ahead to take the down trees, we decided very early on, that we would want to re-purpose the wood for furniture items. It has been a little over two-years since these trees were removed from our yard. At that time, we also had a portable band-saw operator come out to our house to mill these large trunks into boards. Once these boards were cut, Adam and two friends helped him carry and stack the boards with block spacers to allow the boards to dry.
.JPG)
As you can see from the photo above, the slab shown at the bottom right is one of the boards that we pulled for the table. Essentially, we cut this guy in half to create both halves of the table.

We were really excited at how beautiful and near-perfect the boards turned out to be! After the bark was removed, the two halves were sanded until they were both touchably-smooth. I will not elude to you guys that the sanding was a piece-of-cake. In fact, that part of the project took Adam the longest in man-hours, no doubt about it!

.JPG)
.JPG)
.JPG)
Once all of that tedious sanding was finished, we could select a color.
.JPG)
Before making any selections, Adam created test samples for us to choose from. We decided between stains and oils. Ultimately, we selected the fruit wood stain that gave the wood an-all over, even and continuous tone; since these are two slabs that are positioned next to each other. The Danish and Teak oils appeared to pronounce the differences in both slabs. The sliced boards do vary in tones along with having pits, knots, and character markings. The thought behind the stain was that it would marry the two slices, so that they would match and not appear too different from one another.

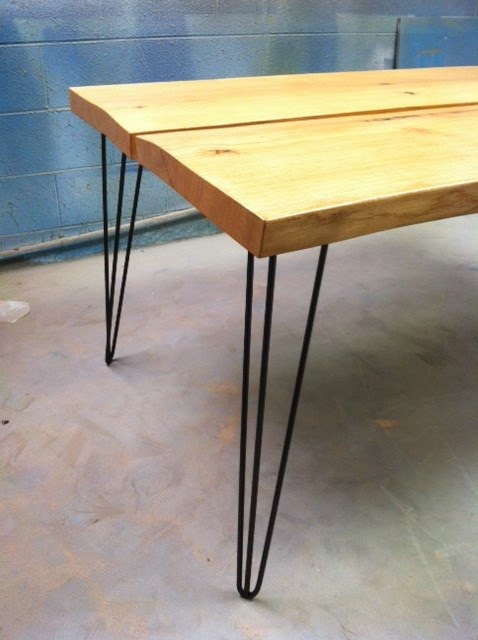
This photo gives the best representation of how the fruit wood stain turned out on the two slabs! After the table got its stain, Adam proceeded to drill out holes for metal-rod dowel connections for the slabs. We opted to leave a space down the center of the table as a connection reveal or design detail.


After the rod connections were in place, Adam welded a special hair-pin leg, that we like to call a "tri-pin" leg. These were coated with a high-quality, auto-body paint before they were attached to the table. And Voi-la, here you have it, our newest IDM creation!!
.JPG)
.JPG)
Before we try and sell this guy, we plan to make coordinating benches and pair them with a couple of Mid-Century style arm chairs for the ends. After all is done, I honestly may want to keep it all for myself! :)
Until next time!!
-B
Hi,
ReplyDeleteI've got some slabs I want to do the same thing you did with your table. Where did you get the metal Dow rods and do you know the weight they are rated for? I'm guessing pretty heavy since you used a couple oak slabs. I'm planning on ripping my red oak slab down the middle to create a coffee table or office desk with the same look.
Thanks
Also how did you secure the rods? Glue or is there someway to anchor them?
ReplyDelete